Showing posts with label Arts Crafts DIY. Show all posts

Saturday, 25 April 2015

Recycling the Recycling Box & Planting Hanging Baskets

Yesterday, I did something I've been meaning to do for ages. I recycled the recycling box, and turned it into a planter for the front garden. The council provided us with blue plastic recycling boxes, but then a couple of years ago, they changed their mind and replaced them with a large blue wheelie bin. (I should have thought to photograph the 'before' photo of the ugly box for this blog). I disguised the ugliness with some sacking cloth, attached with garden twine (I have also given the same treatment to a plain plastic pot beside it), filled the box with multi-purpose compost, and began potting up shade-loving plants, as this arrangement is destined for my shady front garden. I relocated my hostas and pieris from the south-facing back garden, which is always hot, in direct sun. (You can't see the hostas in this photo yet, as it's a bit early for them, and the pieris hasn't been too happy in the back, so it's not at its best. I'm hoping it will prefer the shadier conditions at the front). I also added some ornamental grasses, an ivy, and a hardy fern. I think the recycling box makes a good planter. I'll update with photos in summer when the plants have got going.


I also planted up my hanging baskets yesterday. I know it's a bit early according to most, but I have no greenhouse, and my plants have been sitting on the outside window hardening off for a couple of weeks now. Some are already flowering, all were outgrowing their pots, and we've had a heat-wave over this last week or so, which has made it hard to keep them watered in their tiny pots, so they were ready. I haven't hung the hanging baskets yet. I've balanced them in plant pots, so that they are off the ground, but still sheltered. By day, I sit them on the sun-drenched patio. At night I am moving them around the side of the house where it's sheltered. We're due worse weather this weekend, so I'll continue to keep them sheltered for a week or so, before hanging them ready for May. There are three hanging baskets (12", 14" and 16"). Each of the hanging baskets contains an ornamental grass in the centre, for height, some creeping jenny, and an ivy. (I'll list the other plants individually below). I also potted up three spare petunia 'Tumbelina' (Joanna, Julia, and Susanna) with another ornamental grass in a pot covered with sacking cloth for the patio.

This is the largest (16") basket, and will be hung at the back of the house - south facing. As well as the grass, ivy, and creeping jenny, this basket contains trailing Ivy Geraniums ('Precision Amethyst,' and 'Precision Burgundy Red'), a trailing Pelargonium ('Blizzard' white), trailing Callie (in purple), Convolvulus ('Sabatius Blue'), and Petunias ('Fanfare Dark Blue,' 'Fanfare Lavender Vein,' 'Tumbelina - Angela,' and a mini 'Double Blue'). I may have over-filled this basket for the back garden, but as this is my first year attempting hanging baskets, I'm keen to see which plants fare best, so if it becomes over-crowded in summer, I may have to separate some of the plants out.

This is the 14" basket, and I'm hoping to hang it at the front of the house in semi-shade. This is potted up with five different Surfinias (as well as the grass, ivy, and creeping jenny). The Surfinias are 'Sky Blue,' 'White,' 'Blue Topaz,' 'Burgundy (Keiburtel),' and 'Sunblu.' I've read that Surfinias should be OK in semi-shade, so I'm crossing my fingers that they'll get enough light at the front of the house.

And lastly, this is the 12" basket, which is also going to the front of the house in semi-shade. This contains just three trailing fuschias (as well as the grass, ivy and creeping jenny). 'Southern Belle Trailing Deep Purple,' 'Southern Belle Trailing Blue Mirage,' and 'Trailing Trudi Davro.' Again, I have read that fuschias shouldn't mind semi-shade, so am hoping they will get sufficient light.

This is a photo of the first of the petunias in flower. Hoping for many more of these!

Saturday, 4 April 2015

Easter Festivities

Continuing my resolution to celebrate all the seasons of the year, spring is well under way, and I have bedecked my kitchen in Easter decorations. Most of my seasonal decor finds its way onto the piano. Music features heavily in my life, so it seems to make sense that the piano (which resides in the kitchen/diner where we spend most of our time), becomes the focus for my themed trimmings, and it seemed to work particularly well with my Easter artefacts. My post-Christmas blues have passed, and as the weather warms up and the garden comes to life, I feel my spirits rise. I really enjoyed putting this display together, and will probably extend it from year to year (there were some ideas I didn't have time to complete this year). Easter is one of my favourite times of year, with its own special atmosphere. I always feel there is a sense of peace and tranquility over the Easter weekend, and these little celebrations provide a cheerful motif to look forward to each year.


My decorations began with an 'Easter Tree.' I still haven't found a little twig tree with fairy lights (I liked the idea of re-using one throughout the year with different seasonal decorations). In the absence of finding one I like for a reasonable price, this variation on a 'tree' is really twigs of forsythia and flowering currant from my Dad's garden, arranged in a vase, with Easter decorations adorning them. I think these decorations are by Gisella Graham, who does a wonderful seasonal range, differing each year. You can usually find them online, or in 'crafty shops.' 

As well as the 'Easter Tree' I added some green organza fabric, and lots of other spring-themed tokens. I usually try to avoid chocolate (this year, there was more forth-coming than usual), and many of these items make great substitutes. Several were gifts for my little boy, new to us this year. He was very excited to see them on Easter morning. Included in my Easter arrangement, there are duck, rabbit and bird soft toys, some eggs decorated with tissue paper, a little primrose in a teacup and saucer (technically a Mother's Day gift, but I included it because it seemed to fit), rabbit ears, a bowl of daffodils, and various crafts my son made in an Easter basket. The two chicks in the nest were new gifts (one hops, one cheaps - both were about £1 each), as well as a hopping rabbit. These were intended as chocolate substitutes, but we did end up with some chocolate eggs, too (as you see).


There are also two variations on a theme that I made using string and a balloon. The first is the nest. This is just made using garden twine, dipped in PVA glue, and wrapped around the balloon to create a nest shape. Once dried, it is reasonably sturdy and convincing (as well as very easy to make). The second is the 'grass basket' (which contains some small chocolates). This was made using a similar technique, draping cut lengths of wool dipped in PVA glue over a balloon. This was more time consuming, and I didn't have time to add as many layers as I'd have liked, so it isn't as sturdy, but I like the overall effect. 


Outdoor Easter Tree

I had not one, but two attempts at Easter themed activities this year, because we were away in Scotland during the run up to Easter. So we had an Easter outdoors, prior to making my indoor display over the weekend. I've heard that some villages adorn their trees with Easter ornaments, which I think is a lovely idea. They looked beautiful hanging on a moss covered tree, with the sun shining behind them (I don't think they'd have liked being left out in the rain, though).


Easter Wreath

Lastly, I made this wreath for Easter. I saw some beautiful ideas on Pinterest, but had minimal time in the end, so this is rustic and simple! It combines symbols of a mish-mash of different faiths. At the end of the day the Easter we have come to know is based on a combination of different cultural traditions. So here we have a rustic wooden cross (this was bought from a Palestinian charity). Some baby chicks on a mossy twig, on a straw wreath. And a couple of sheep purchased on my travels (these also come out at Christmas - I think they were from Peru, if memory serves). There is yellow organza fabric tied around the top of the wreath, and draped behind, which looks like sunshine shining through the window all day long.


Children's Easter Book Recommendations

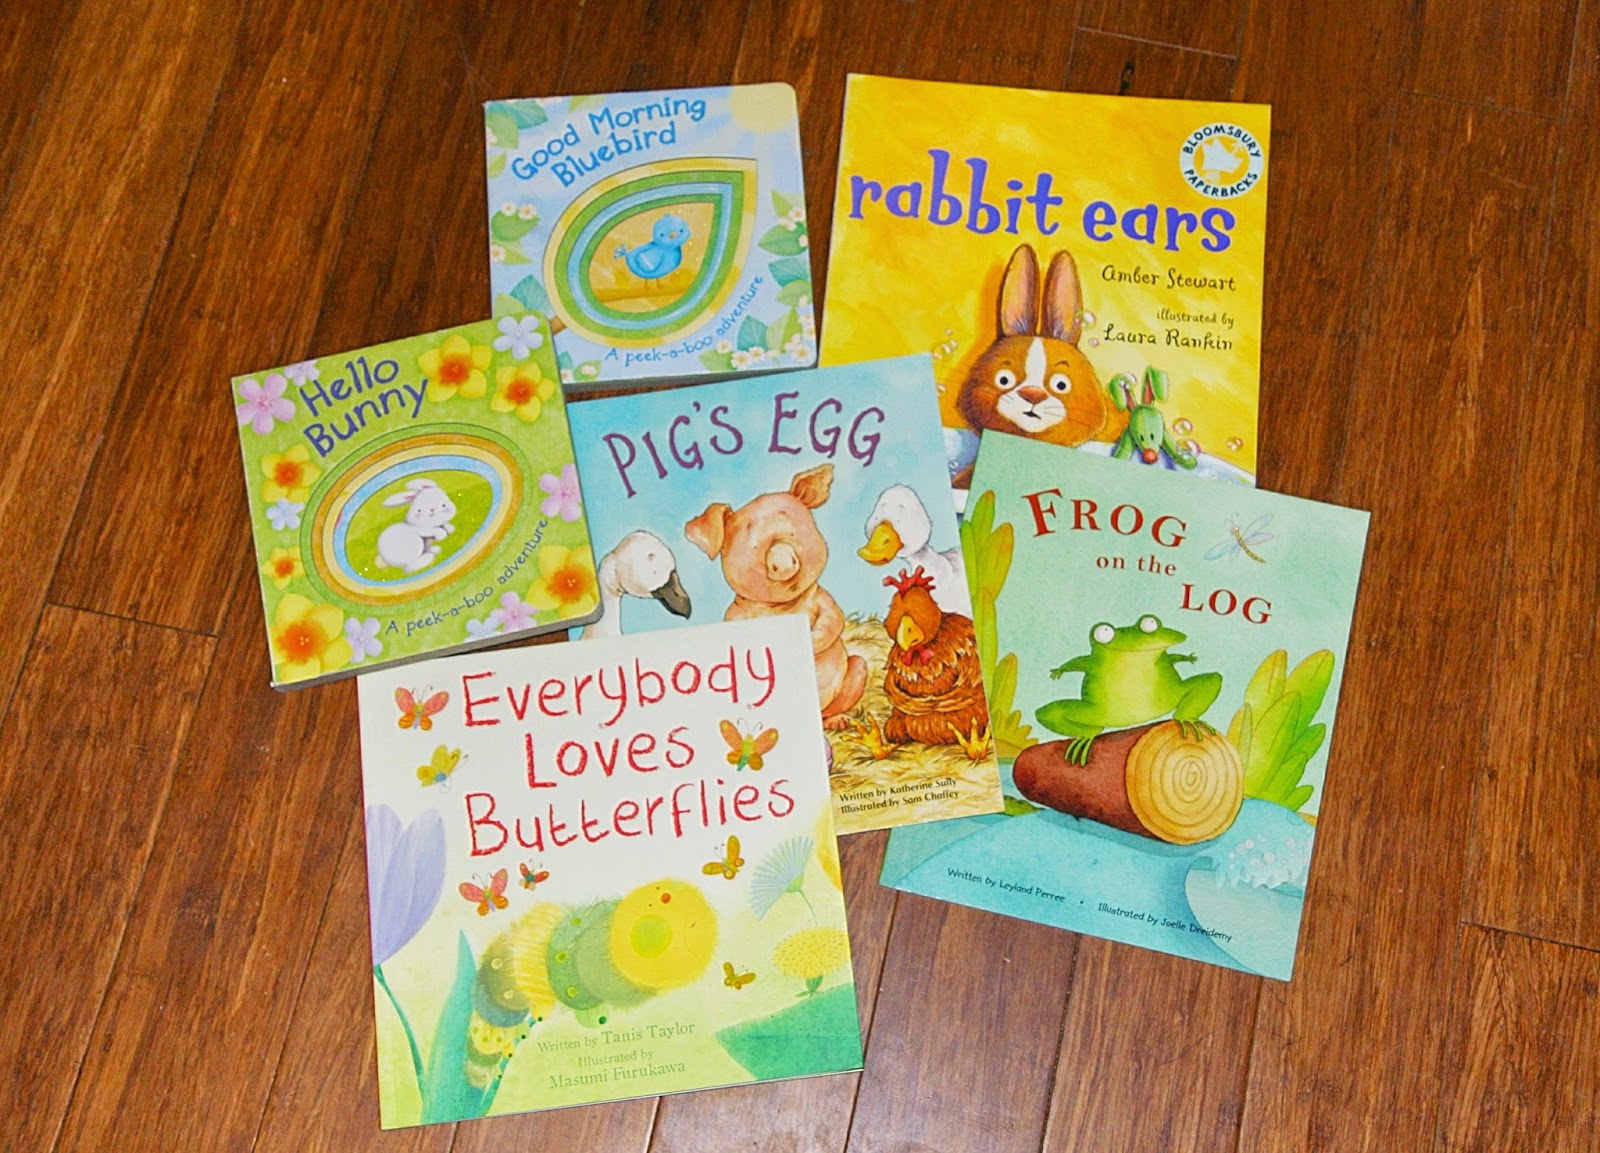
And finally, for parents who, like me, are looking for alternatives to chocolate for Easter (albeit some chocolate seems to have crept into our household this year), I have a tradition of giving a book to my son for an Easter present (preferably something vaguely themed). Though none of these are specifically about Easter, they feature Spring-like story-lines and pictures, and seem appropriate for the season. These are some of my recommendations:


For the under twos (from age 0+), 'Hello Bunny,' and 'Good Morning Bluebird,' both Peek-a-boo adventure board-books, by Parragon Books.

For age 3+ :
'Rabbit Ears' by Amber Stewart, illustrated by Laura Rankin, Bloobsbury paperbacks.
'Pig's Egg' (my son's current favourite), by Katherine Sully, illustrated by Sam Chaffey, published by Cupcake.
'Frog on the Log' by Leyland Perree, illustrated by Joelle Dreidemy, published by Cupcake.
'Everybody Loves Butterflies' by Tanis Taylor, illustrated by Masumi Furukawa, by Parragon Books.

Recommendations welcome for Easter themed books for older children, as I intend to continue this tradition as my son grows older.

Friday, 13 March 2015

The making of a Mother's Day card


This is an easy way of creating 'marbled paper' I found on Pinterest. You can find more detailed instructions here. (I can't claim any credit for the idea).
In a nutshell, you squirt shaving foam over a tray (we used a plastic chopping board), and squeeze poster paint over the top, which you then swirl into patterns and press the paper over the top. Remove the foam with a squeegee (car-window scraper will suffice), and the pattern from the paint remains. We made several of these, and have used them for various greetings cards, including the Mother's Day card featured in the following blog post.

Saturday, 14 February 2015

Seasonal Holiday Tree


I don't know about anyone else, but I always feel a bit 'down' at the beginning of the year. I love Christmas, the run up to it, and especially all the twinkly lights and nostalgic decorations. It makes me feel sad when all the Christmas decorations come down, and it's dull and grey outside.


So, this year, I have come up with a plan to counter my seasonal blues. I want to celebrate all the seasons of the year, with festive ideas all year round! Hopefully, this will always give me something to look forward to.
I had left the idea a little bit late, but even so, I wanted to make a 'Valentine's Tree' to start off my seasonal decorations. This one is very basic, just a few red dog-wood twigs from my own garden (I love dog-wood!), and some home-made heart decorations, with some pink tissue paper in a clear glass vase. I call it my 'Valentine's Twee' (because it is a bit). My boy helped me make some of the decorations, and I'm on the look out for some (tasteful!) ornaments that we can re-use every year.


I want to decorate an Easter Tree too (I already have some ideas in mind for that). I was hoping I might find a nice white tree with fairy-lights that I could use for Valentine's and Easter, but I don't want to spend a fortune. I haven't seen one I like yet, so in the mean-time, my dog-wood will suffice.


Other festive ideas I plan to do throughout the year, include:
Valentine's Tree
Easter Tree
Summer Solstice (fairy garden outdoors - I made one last year, and will replenish it this year to celebrate Summer).
Halloween Tree

These are a few festive ideas to get me through the year. What else am I missing? Ideas appreciated! Especially things my little boy might enjoy.


Sunday, 20 July 2014

Project Front Garden

When we bought our house, several years ago, it had no front garden. The garden-wall that ought to have been there had been demolished, and thick concrete had replaced where the garden should have been. Effectively, we just had an extra wide pavement, that people used to skateboard on. Not ideal. 
Around March 2014, I started to make enquiries about replacing the wall. (I felt there was no point in reinstating the garden, without some means of stopping people from walking across it). One day, I went onto a local facebook group, to ask if anyone could recommend a local brick-layer. And by chance, a few posts down, someone was offering free bricks...
I rang them on the same day, and we went to their garden, where sure enough, they had knocked down their crumbling garden wall, and had around 2000 bricks on offer (more than enough to rebuild our own wall, as well as our neighbours', as theirs was also missing). Not only that, but the bricks were from the right era - they were identical to the wall that should have been there. They even had matching half-round bricks for the top of the wall on offer, so we could match our new wall with the original, existing wall from next door.
There were two obstacles in place: firstly, the transportation of the bricks. They were free for collection, and only a couple of miles away, but bricks are heavy! The garden they came from was up a narrow side street where an articulated lorry would never have had room to manoeuvre (even if the cost of hiring one had been an option).
Everyone said we were mad, but we took the back seats out of our Citroen Xsara Picasso, read the manual to establish the maximum weight capacity, did some sums, and began transporting bricks - load by load - back to our house. It took about twenty journeys, and we worked in rain and sun, but eventually, we had accumulated enough bricks (we hoped!) to do the job.
The second obstacle was the fact that the thick concrete was still in place. Logic dictates that it would have made sense to remove the concrete before reinstating the wall. But free bricks wouldn't wait, and I knew the opportunity was too good to pass up. So we left the concrete in place, while we collected enough bricks. The two photos below demonstrate about twenty loads of bricks, prior to dressing, stacked on the ugly concrete in front of our house.

That enormous pile of bricks then had to be dressed, by hand. The stack on the right (of grubby bricks) gradually became the stack on the left (of dressed bricks). Fortunately, our neighbours were cooperative! The photo below is the project 'at its worst.' The dressed bricks were stacked and waiting, and the concrete had been dug out enough to enable the wall to be built. It was at this point, we discovered just how thick the concrete was, and that it would be a big task to remove it.
Nevertheless, the wall went up, using most of the pile of bricks, as well as the half-rounds for the top.
 And we then began the mammoth task of breaking up these thick chunks of concrete.

Once the concrete was eventually broken up, we then hired a skip for its removal (and had a little help, from a certain small person).


And the front garden began to resemble a front garden...
We bought some railway sleepers to make a raised garden. (They were a bargain on ebay, but believe me when I tell you, they weigh a tonne! Again, transported by hand, via the Xsara Picasso). And we used most of the remaining bricks to raise the ground level up to the doorway.

We then positioned the railway sleepers and top-soil for the raised bed, and had gravel delivered to fill in the gap and cover the unusable earth. And at last, I was finally able to plant up my front garden with some hollies (for year-round foliage), roses for summer colour, and various other plants and shrubs. This photo was taken towards the end of last summer, after the garden was planted up, but before it was completed.
In autumn I planted a variety of spring bulbs, which have burst into life this spring now that the garden is completed. The bins are disguised with a bamboo screen, and there is a dividing fence between our own garden and the neighbours'. There is bamboo growing in an upcycled galvanised bin, and a Corkscrew Hazel beside the front door. I'll upload a separate post with photos and descriptions of the plants in our new front garden, but this completes our front garden! (With apologies that most of these photos are poor quality phone photos. Expensive cameras and heavy labour don't mix well, but I still wanted to document the progress of this project).

The latter two photos were added retrospectively, in spring 2015.

Friday, 20 June 2014

Fairy Garden


I made a fairy garden, today. It was inspired by an idea I saw on Pinterest, so I can't take credit for the concept, but I did modify it to suit myself. This consists entirely of 'found objects' (with the exception of the alpines, which I bought specially for the purpose). As much as I'd like to say I built this for the sake of my toddler, the reality is that he napped throughout its creation, and wasn't all that interested in the finished product (apart from the fairy jewels. Those, he'd love to play with... and lose... instantly).


The pot belonged to a friend, whose garden I visited recently. He was mourning the loss of this fabulous pot, due to fox damage (or some other creature). I sympathised, and asked if I could have it! May have seemed an odd request, but I already had the fairy garden in mind. I had originally hoped to find or create a little fairy-house for the top of it, but as I already had this rather fabulous tree root amongst my collection of found objects, I thought a tree-house made a much more organic 'home' for the fairies to inhabit. Other ingredients include some glass beads, some odd earrings (I'm always losing one of the pair), some moss taken from other plants around the garden, and a borrowed snail. I'm not sure what the little 'tree' to the right is. It looks like a bonsai, though I'm certain it isn't. My Mum gave it to me, and it seems to thrive in all conditions, so I'm hoping it will cope with the same conditions as the alpines (even if the moss doesn't).

For anyone interested in such things, the alpines are (according to their labels):
Leptinella (Platt's Black)
Isotama (Fairy Carpet)
Armeria (Nifty Thrifty)
Sedum (Coral Carpet)
Ajuga (Metallica Crispa)
Mentha (Requienii) - which smells divine, by the way.


And at night, the tree house is lit by a little LED light, so the fairies can party in style. Hopefully, word will spread, and it will be inhabited by the fairy folk by Summer Solstice, tomorrow.